Excel SUMPRODUCT Function

The SUMPRODUCT function is one of those hero functions that, once discovered, you wonder how you ever managed without. It does not just do “what it says on the tin”, there’s a lot more to it than that. In particular, it’s one of the most powerful and flexible filter functions in Excel. And so much better than SUMIF or SUMIFS.

Excel SUMPRODUCT Function

Excel SUMPRODUCT function

Table of Contents

Excel SUMPRODUCT Function

The Excel SUMPRODUCT function is one of those hero functions that, once discovered, you wonder how you ever managed without. It does not just do “what it says on the tin”, there’s a lot more to it than that. In particular, although it’s not obvious, it’s actually one of the most powerful and flexible filter functions in Excel. This means that all those formulas where you would normally use SUMIF or SUMIFS can be done with SUMPRODUCT. And they can be done so much easier!

The Usual Use of SUMPRODUCT

The usual implementation of SUMPRODUCT is to calculate the SUM of the products of multiple ranges. In plain English, “give me the total of this range multiplied by that range”. You can have more than just two ranges.
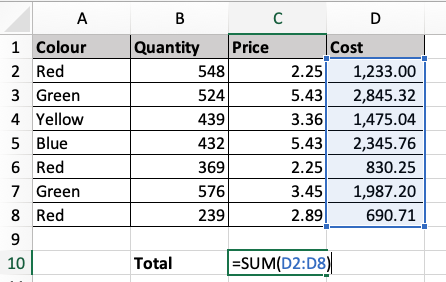
Helper Column
SUM formula to total the helper column

In this example we want to multiply the Quantity by the Price and then SUM the results. Usually you would create a helper column, as we have done here in column D, where you multiplied the values in column B by column C and copied the formula down. Then SUM the results.

There is nothing the matter with this method, it’s perfectly understandable and straightforward. But you don’t really need the helper column.

By using SUMPRODUCT you can make the calculation directly without needing the extra, helper column. Simply give me the total of the first range multiplied by the second. The function does the cross-calculation for each row and then returns the cumulative total.

=SUMPRODUCT(B2:B8,C2:C8)

Fantastic, but not for everyday. Like many Excel functions, it’s rare that you actually need to do that sort of calculation. 
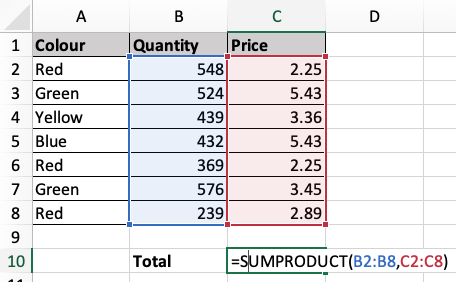
SUMPRODUCT does it in one
Total of the Quantity multiplied by the Price

SUMPRODUCT as a Filter Function

But SUMPRODUCT can also be used as a filter function. And, of course, these are the formulas that we do everyday. In this role, the function works on TRUE/FALSE values and its much faster, more efficient and more flexible than its SUMIF or SUMIFS equivalents. Although most people will find the formulas much harder to understand. In our example below, we need to add up the numbers in column B where we have “Red” in column A. Most people would use either SUMIF or SUMIFS for this. 
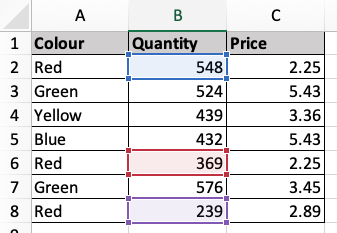
The answer is 1156
Add the values in column B where it's Red in column A

Here’s the SUMPRODUCT formula to add the numbers in column B where there is “Red” in column A:

=SUMPRODUCT(- -(A2:A8=”Red”),B2:B8)

Or you use a simpler expression by simply multiplying the two ranges:

=SUMPRODUCT((A2:A8=”Red”)*B2:B8)

Answer is 1156. Values are 548+369+239.

Entering the SUMPRODUCT formula

Don’t forget the double minus trick and the brackets around the expression. The two minus signs coerce the logical values to ones and zeros. If you select the cell where you have the formula you can see how it works internally by clicking Formulas, Evaluate Formula then click the Evaluate button. The first array evaluates to Boolean TRUE and FALSE values. You will see that there are three TRUE values, the three cases where we have “Red” in A2:A8. This TRUE then evaluates to numeric 1 and is used to multiply the values in the B2:B8 range and then, finally, return the total.

But you don’t need to know how it works internally, you just want it to do your calculations. So, whenever you need it, you just do a copy and paste. Once you have working examples of viable formulas you can easily adapt them to your own needs. I am going to stick to the minus, minus form for most of the subsequent examples, because I think it keeps the Boolean expression clearer, especially where it is complex.
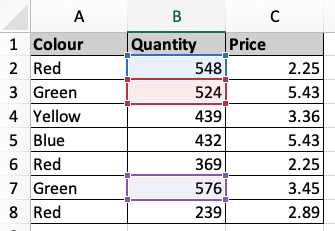
The answer is 1648
Add the values in column B which are 500 or more

You can use numeric expressions with comparative operators, of course. And the same range may be referenced more than once. In this example, we want to add up the values in column B which are 500 or more.

=SUMPRODUCT((B2:B8>=500)*B2:B8)

Answer is 1648. Values are 548+524+576.

Complex Filter Expressions
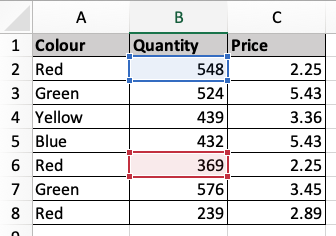
The answer is 917
Add the values in column B which are Red and 250 or more

If you need a more complex filter, where you have more than one condition to satisfy, then multiply your range references. And use the minus, minus form of the formula. Here we need to calculate the total of the values in our Quantity column B where column A is “Red” and column B is 250 or more.

=SUMPRODUCT(- -(A2:A8=”Red”)*(B2:B8>=250),B2:B8)

Answer is 917. Values are 548+369.

Boolean Logic AND/OR
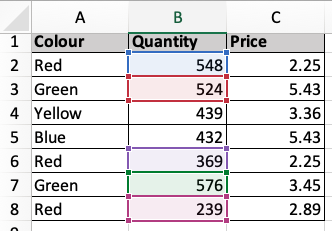
The answer is 2256
Add the values in column B which are Red or Green

In the previous example, the logical form was an AND. The value in column A must be “Red” AND the value in column B must be 250 or more. Both conditions must be satisfied.

Use Multiplication for a logical AND form. Use Plus for a logical OR. Add the values in column B where it is “Red” or “Green” in column A:

=SUMPRODUCT(- -(A2:A8=”Red”)+(A2:A8=”Green”),B2:B8)

Answer is 2256. Values are 548+524+369+576+239.

And you can combine the two logical forms AND and OR. Always using the standard convention, AND is Multiply, OR is Plus. In this example, we must add the values in column B where column A is “Red” or “Green” and column C is the value of 3 or more.

=SUMPRODUCT(- -((A2:A8=”Red”)+(A2:A8=”Green”))*(C2:C8>=3),B2:B8)

Answer is 1100. Values are 524+576. Only “Green” values are calculated as all the Prices for “Red” are under 3.
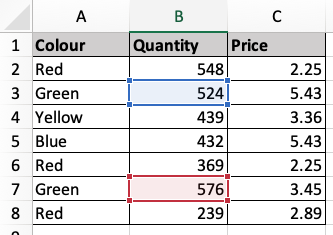
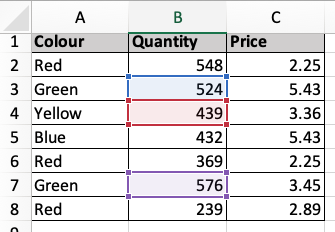
Add the values in column B which are Red or Green and column C is 3 or more
The answer is 1539
Add the values in column B which are Red, Green or Yellow and the Price in column C is 3 or more

There’s no real restriction to the number of conditions which you can incorporate into your formula. Just keep everything inside brackets. In the final example the column A value is “Red”, “Green” or “Yellow” and column C is 3 or more:

=SUMPRODUCT(- -((A2:A8=”Red”)+(A2:A8=”Green”)+(A2:A8=”Yellow”))*(C2:C8>=3),B2:B8)

Answer is 1539. Values are 524+439+576.

If you ever need a negative expression in your formula, use the inequality operator (<>) or the NOT function. For example, not equal to “Red” is either (A2:A8<>”Red”) or (NOT(A2:A8=”Red”)).

SUMPRODUCT compared to SUMIF/SUMIFS

I think we’re getting the general idea. You only need a few working examples that you can substitute into. The more complicated formulas with multiple conditions are much easier to do than their corresponding SUMIF and SUMIFS equivalents. I like the other functions and, it has to said, they are far more commonly used than SUMPRODUCT. But, and it’s a big but, while SUMIF and SUMIFS are great for simple criteria, as soon as you need anything complicated, they become both clunky and difficult. Whereas SUMPRODUCT will easily accept the most complex filters.

Excel course

To get the best out of Excel formulas you’ll need to have a good, working knowledge of Excel functions. Come along on our dedicated Excel functions course and discover what Excel formulas can do for you.

Call 020 7920 9500 now for details.

Related Posts

Excel SUMPRODUCT function

The SUMPRODUCT function is one of those hero functions that, once discovered, you wonder how you ever managed without. It does not just do “what it says on the tin”, there’s a lot more to it than that. In particular, it’s one of the most powerful and flexible filter functions in Excel. And so much better than SUMIF or SUMIFS.

Read More »
Age from Date of Birth

It’s easy to calculate someone’s age from their date of birth if you know about Excel’s DATEDIF function, unfortunately it’s easy to miss this function as it is not documented. Excel will not help you fill in the DATEDIF function interval values, you need to see the list here.

Read More »
Excel double click tricks

Our Excel double click tricks are some of those little things that make your life so much easier. You probably know most of them already. Or do you? I think that anyone who uses Excel regularly should know them.

Read More »
Excel New text Functions

Complicated text formulas using either ampersands and the CONCATENATE function are the bane of our life. Not any more! Excel new text functions will really help us nail those text formulas. We’ll be looking at the CONCAT function and the TEXTJOIN function.

Read More »
Excel Percentages and Differences

Usually the formulas you need for percentages and differences are quite straightforward: divisions for percentages and a minus sign to take one value from another. But there are pitfalls for the unwary which we shall explore.

Read More »
Excel Filter function

I think the Excel FILTER function does the filter job better than AutoFilter. It’s a live formula and an extraction, you don’t have to filter your data in place. There’s no need for that clunky Advanced Filter…

Read More »

Excel Age from Date of Birth

It’s easy to calculate someone’s age from their date of birth if you know about Excel’s DATEDIF function, unfortunately it’s easy to miss this function as it is not documented. Excel will not help you fill in the DATEDIF function interval values, you need to see the list here.

Excel Age from Date of Birth

Age from Date of Birth

Table of Contents

Excel Age from Date Of Birth

Excel Calculating Age from Date of Birth – It’s easy to calculate someone’s age from their date of birth if you know about Excel’s DATEDIF function, unfortunately it’s easy to miss this function as it is not documented. I am baffled as to why it is never included in the list of Excel functions.

To have a formula that updates itself as time goes on you need to get the current date into your formula and you can do this using either the NOW or TODAY functions. There’s no substantial difference between the two functions for this calculation; NOW gives you the current date and time, whereas TODAY just gives the current date. When you enter the function into your formula remember to include the brackets like this, NOW() or TODAY().

excel age from date of birth

So, to calculate someone’s age in years make sure that you have entered their date of birth correctly as a proper Excel date (using slashes or dashes) and then enter the formula:

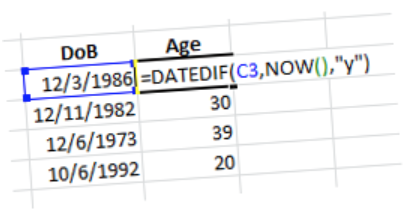
=DATEDIF(C3,NOW(),”y”)

Where C3 is the cell containing the date of birth. The interval value “y” must be entered in double quotation marks. The age is calculated in whole calendar years and will update on the subject’s birthday. If you want to calculate the exact age and include the months or even the days then you have to change the interval value. Refer to the table of interval values below for further details.

Sample DATEDIF Formulas

To calculate the age in months for the current year, the formula is:

=DATEDIF(C3,NOW(),”ym”)

And therefore, to state the age in this type of format: “24 years, 8 months” the formula is:

=DATEDIF(C3,NOW(),”y”) &” years, “&DATEDIF(C3,NOW(),”ym”)&” months.”

No! Don’t type it all in, copy and paste it from here. I always do, life’s too short to have to reinvent formulas like this.

The DATEDIF Worksheet Function

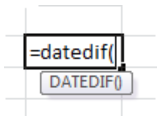
The function is not documented so I am going to have to be a bit boring and do the documentation here in case you want to Bookmark this page. I always find the interval values a bit difficult to remember; “y” for year is dead easy but I struggle to remember the others. The only time you see any indication that DATEDIF exists is when you type it into a cell and Excel pops up a ghostly apparition as you enter the first bracket.

excel age from date of birth
This function is available in all versions of Excel since way back:
 
=DATEDIF(Date1, Date2, Interval)
 
Date1 is the first date, Date2 is the second date. Date1 should be before Date2 in the calendar. Interval is the interval type and must be one of the values from the following table: 

Interval Values for the DATEDIF function

Interval Description
m
Complete Calendar Months
d
Number of Days
y
Complete Calendar Years
ym
Months excluding Years
yd
Days excluding Years
md
Days excluding Years and Months

The first three interval values give the gross number of years, months or days between the two dates and the last three interval values work out the days and months as if the dates were in the same year and are very useful for calculating the fragments of months and days where the date difference needs to be calculated precisely.

You must enclose the interval in double quotation marks if you are including it directly in the formula or you can enter it into a cell without quotation marks and use the cell reference of the cell in the formula instead.

If Date1 is later than Date2, DATEDIF returns a #NUM! error. If either Date1 or Date2 is not a valid date, DATEDIF returns a #VALUE! error. If Interval is not one of the items listed in the table, DATEDIF returns a #NUM! error.

Watch the Video

Excel course

To get the best out of Excel formulas you’ll need to have a good, working knowledge of Excel functions. Come along on our dedicated Excel functions course and discover what Excel formulas can do for you.

Call 020 7920 9500 now for details.

Related Posts

Excel SUMPRODUCT function

The SUMPRODUCT function is one of those hero functions that, once discovered, you wonder how you ever managed without. It does not just do “what it says on the tin”, there’s a lot more to it than that. In particular, it’s one of the most powerful and flexible filter functions in Excel. And so much better than SUMIF or SUMIFS.

Read More »
Age from Date of Birth

It’s easy to calculate someone’s age from their date of birth if you know about Excel’s DATEDIF function, unfortunately it’s easy to miss this function as it is not documented. Excel will not help you fill in the DATEDIF function interval values, you need to see the list here.

Read More »
Excel double click tricks

Our Excel double click tricks are some of those little things that make your life so much easier. You probably know most of them already. Or do you? I think that anyone who uses Excel regularly should know them.

Read More »
Excel New text Functions

Complicated text formulas using either ampersands and the CONCATENATE function are the bane of our life. Not any more! Excel new text functions will really help us nail those text formulas. We’ll be looking at the CONCAT function and the TEXTJOIN function.

Read More »
Excel Percentages and Differences

Usually the formulas you need for percentages and differences are quite straightforward: divisions for percentages and a minus sign to take one value from another. But there are pitfalls for the unwary which we shall explore.

Read More »
Excel Filter function

I think the Excel FILTER function does the filter job better than AutoFilter. It’s a live formula and an extraction, you don’t have to filter your data in place. There’s no need for that clunky Advanced Filter…
Read More »

Excel Double Click Tricks

Our Excel double click tricks are some of those little things that make your life so much easier. You probably know most of them already. Or do you? I think that anyone who uses Excel regularly should know them.

Excel Double Click Tricks

Excel double click tricks

Table of Contents

Excel Double Click Tricks

Our Excel double click tricks are some of those little things that make your life so much easier. You probably know most of them already. Or do you? I think that anyone who uses Excel regularly should know them. Have a quick wizz through and see if there’s anything that you might find useful.

Copying a Formula Down the Column

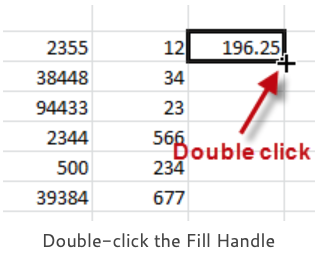
This the best one. I wasted long years of my life dragging formulas down the column until I discovered that all you had to do was double-click the corner of the formula cell.

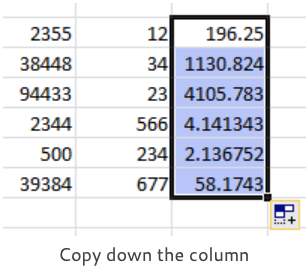
I didn’t know whether to laugh or cry. It’s so easy. Hover your mouse over the lower right-hand corner of the cell and wait for the Fill Handle (black cross) to appear. Then double-click to copy the formula down the column. For me, this the best ever Excel double click trick.

double click fill handle
copy down the column

So long as there are no blank cells in the previous column your formula copies all the way down to the end. The end of what? The end of the previous column, that’s why it’s a really bad idea to leave a blank column between your last data column and the column used for the formulas.

This double-click to copy down method is so much better than dragging that it’s usually easier to delete your blank column, do the copying and then insert the blank column afterwards.

Adjusting Column Widths

This method also works with row heights but it’s dealing with column width problems where it really comes into it’s own.

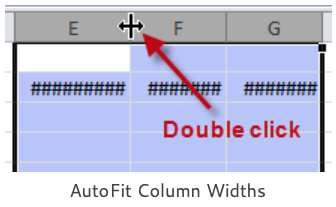
We are all familiar with the column width problem where you have the hash signs displayed in your cells. The last thing you want to do is start dragging the column wider, instead hover your mouse over the right-hand edge of the column until the double-headed arrow appears and then double-click to apply an automatic column width. This is based on the longest entry in the column.

autofit column widths

Remember, work on the columns and not the cells containing the hash signs. If you have several columns to adjust, which is often the case, then select them first. Click on the first column letter and then drag across to select the others. Double-click between any two columns in your selection and all the columns are done in one go.

Using the Format Painter

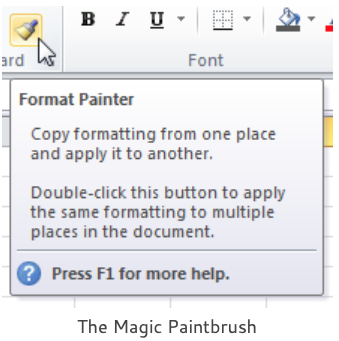
Most of the MS Office applications have a Format Painter control which you can use to copy all the formatting from one place to another. That’s ALL the formatting in one go. But just once.

What is not so obvious is that when you double-click the Format Painter you can repeat your formatting by continuing to click on additional items. The Format Painter stays on until you deliberately cancel it by pressing the ESC key or single-clicking the control.

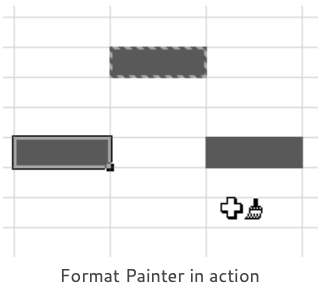
To use the Format Painter in Excel, apply formatting to a single cell or a range of cells and then either click (to paste the formatting once) or double-click. Now, select another cell or range and all the formats (fill colours, borders, fonts, number formats etc.) are copied from the source to where you have just clicked. As you do this you will see a paintbrush image attached to your mouse pointer.

magic paintbrush
format painter in action

The Format Painter control is found on the Clipboard group (on the extreme left-hand side) of the Home tab. In older versions of Excel the Format Painter tool is on the Standard Toolbar.

I laugh at myself every time I use the Format Painter as I used to think that the brush image meant “Paste” and I could not seem to get Copy and Paste to work properly. Then I learned Ctrl+C and Ctrl+V but I still used to copy my formats using the menu; Edit, Paste Special, Formats. Really sad.

Movement and Selection

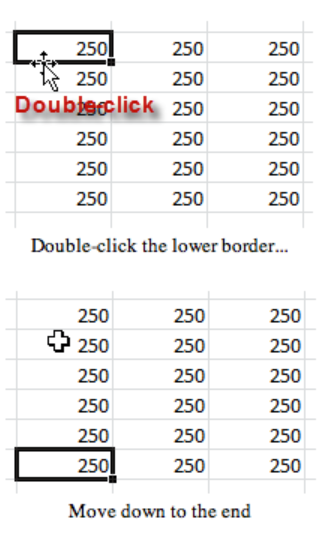
You can double-click the border of the active cell to move it in any direction to the end of the current block of cell data.
 

Double-click the lower border and you move down, left border and you move left, right border to move right etc. You always stop at the first blank cell.

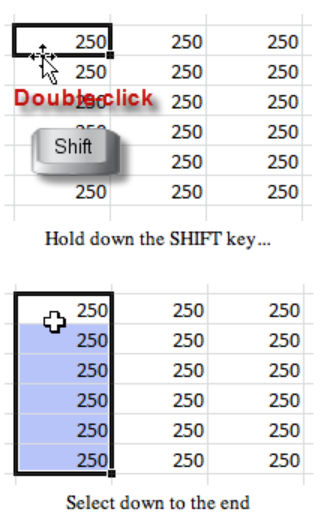
Instead of moving the current active cell, to select the range of cells down or across, hold down the SHIFT key as you double-click one of the borders. You expand your current selection down or across to the first blank cell.

Using the Keyboard

You can do all of this with the keyboard if you prefer. To move the active cell, press the END key and take your finger off it. Excel is now in END mode. Now, press any one of the four arrow keys to move in that particular direction.

Practice using the END key sequence a few times and then you can bring your SHIFT key into play to make selections. Hold down the SHIFT key and keep it held down as you press any one of the END and arrow key sequences.


move down to the end
select down to the end

More Arrow Key Shortcuts

  • Move one cell up, down, left, or right in a worksheet.
  • Ctrl+Arrow key moves to the edge of the current data region in a worksheet.
  • Shift+Arrow key extends the selection of cells by one cell.
  • Ctrl+Shift+Arrow key extends the selection of cells to the last nonblank cell in the same column or row as the active cell, or if the next cell is blank, extends the selection to the next nonblank cell.
  • Left or Right arrow key selects the tab to the left or right when the ribbon is selected. When a submenu is open or selected, these arrow keys switch between the main menu and the submenu. When a ribbon tab is selected, these keys navigate the tab buttons.
  • Down or Up arrow key selects the next or previous command when a menu or submenu is open. When a ribbon tab is selected, these keys navigate up or down the tab group.
  • In a dialog box, arrow keys move between options in an open drop-down list, or between options in a group of options.
  • Down or Alt+Down arrow key opens a selected drop-down list.

Double clicking a cell

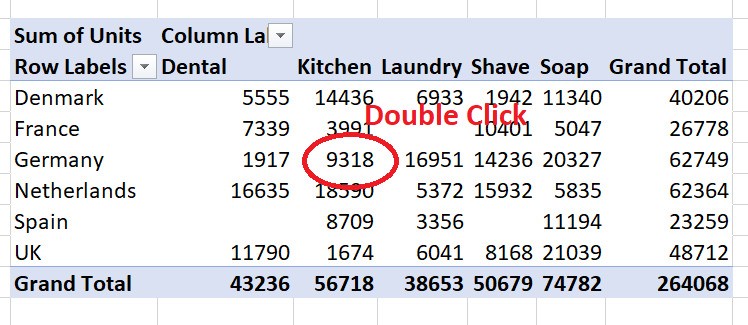
Double clicking on a normal Excel cell doesn’t do very much. It just changes the mode from Ready to Enter so that you can edit the cell entry. But double clicking on a Pivot Table cell is something else. Double clicking on a Pivot Table cell means Show Details, it’s the shortcut alternative to choosing Show details in the right-click menu.

Pivot Table double click
Double click a total in your Pivot Table to see the analysis

Here’s my Pivot Table report and I want to query one of the numbers in the report. Pick a number and double click. Instantly, you will see a complete open-item analysis of that number extracted onto a separate sheet. Now you can see exactly how that total is broken down.

Pivot Table total analysed
Here's the items in the source data that make up that total

If you find that Show Details is not working for you then you should check to see if it’s turned on. Right-click any cell in your Pivot Table and then click Pivot Table Options. Click the Data tab and then check the Enable show details option.

Excel course

To get the best out of Excel Pivot Tables you’ll need to have a good, working knowledge of how to arrange your source data and what kind of reports you can easily generate. Come along on our dedicated Excel Pivot Tables course and discover what they can do for you.

Call 020 7920 9500 now for details.

Related Posts

Excel SUMPRODUCT function

The SUMPRODUCT function is one of those hero functions that, once discovered, you wonder how you ever managed without. It does not just do “what it says on the tin”, there’s a lot more to it than that. In particular, it’s one of the most powerful and flexible filter functions in Excel. And so much better than SUMIF or SUMIFS.

Read More »
Age from Date of Birth

It’s easy to calculate someone’s age from their date of birth if you know about Excel’s DATEDIF function, unfortunately it’s easy to miss this function as it is not documented. Excel will not help you fill in the DATEDIF function interval values, you need to see the list here.

Read More »
Excel double click tricks

Our Excel double click tricks are some of those little things that make your life so much easier. You probably know most of them already. Or do you? I think that anyone who uses Excel regularly should know them.

Read More »
Excel New text Functions

Complicated text formulas using either ampersands and the CONCATENATE function are the bane of our life. Not any more! Excel new text functions will really help us nail those text formulas. We’ll be looking at the CONCAT function and the TEXTJOIN function.

Read More »
Excel Percentages and Differences

Usually the formulas you need for percentages and differences are quite straightforward: divisions for percentages and a minus sign to take one value from another. But there are pitfalls for the unwary which we shall explore.

Read More »
Excel Filter function

I think the Excel FILTER function does the filter job better than AutoFilter. It’s a live formula and an extraction, you don’t have to filter your data in place. There’s no need for that clunky Advanced Filter…
Read More »

Excel New Text Functions

Complicated text formulas using either ampersands and the CONCATENATE function are the bane of our life. Not any more! Excel new text functions will really help us nail those text formulas. We’ll be looking at the CONCAT function and the TEXTJOIN function.

Excel New Text Functions

Excel New text Functions

Table of Contents

Excel New Text Functions

Complicated text formulas using either ampersands and the CONCATENATE function are the bane of our life. Not any more! Excel new text functions will really help us nail those text formulas. In this article we’ll be looking at the CONCAT function and the TEXTJOIN function. We’ll also examine the TEXT function, which is an oldie but a goodie as it’s crucial when you need to format dates or numbers in your formulas.

Old Method

This is the old method. We have the entries “Bill” in cell B3 and “Ben” in cell C3. We want to join them together to return the result “Bill and Ben”. We’ll use a formula because the entries might change and we still want the concatenation to work.

You can use either the ampersand (&), which is the concatenation operator, or the CONCATENATE function. Which one you use is your call.

Using the Operator

Put the formula together in easy stages. The first job is to join the two values together, like this:

=B3&C3

This returns the result, “BillBen”. Not quite finished as we still need to have the word “and” and its associated spaces between “Bill” and “Ben”. Just edit the formula and include the plain text “ and ” into the concatenation. Like this:

=B3&” and “&C3

old method simple formula
Join the values together
old method concatenation
Completed concatenation formula

Plain text constants must be enclosed in quotation marks. Notice that the leading and trailing spaces required are included in the text.

Using the CONCATENATE function

The first job is to join the two values together, like this:

=CONCATENATE(B3,C3)

And then include the “ and ”, like this:

=CONCATENATE(B3,” and “,C3)

Using the CONCATENATE function
Same formula using the CONCATENATE function

Not too difficult and there’s not much to choose between the two methods. The main disadvantage is that you may not use a range reference so when you need to join a range of multiple cell values together you have to reference each cell in the range individually.

CONCAT Function

This is the first new text function to examine. It’s just like CONCATENATE, only much better because It supports range references as well as cell references and constants. The CONCAT function automatically ignores empty cells. Many people have been saying “Concat” for years instead of “Concatenate” as it’s much less of a mouthful. Now we’ll never have to say it again.

We need to join the cell values in the range B3:D3. The formula is:

=CONCAT(B3:D3)

Which returns: “BillTedBen”

If cell D3 is empty, the formula =CONCAT(B3:E3) still returns: “BillTedBen”.

CONCAT function
CONCAT formula for a range of cells
CONCAT with empty cell
CONCAT ignores empty cells

But CONCAT does not give you a way of including a delimiter, like a comma, between the values. For that you need the TEXTJOIN function…

TEXTJOIN Function

TEXTJOIN can do everything CONCAT can do but it’s so much better because it also lets you control delimiters and empty cells. This works wonders when you’re preparing data for CSV format.

TEXTJOIN has three required arguments:

  1. Delimiter is the text to use between the values. It must be enclosed in quotation marks. For no delimiter, enter an empty string (“”).
  2. Ignore_empty is either TRUE or FALSE. TRUE to ignore entries with no content.
  3. Text1 is the first value to join together. This can be a cell reference, a range reference or a text constant.

In this example we have a range of cells to join but ones of the values is missing. Our formula is

=TEXTJOIN(“,”,FALSE,B3:E3)

and returns: “Bill,Ted,,Ben”

TEXTJOIN function
FALSE to include a comma as a placeholder for the missing value

In the next example, we have four columns: First Name (column B), Middle Name (column C), Last Name (column D) and Title (column E). We need to join them together, separated by spaces and with the title entry coming first.

The formula is:

=TEXTJOIN(” “,TRUE,E3,B3:D3)

A range reference joins the data together in the same order as it is in the range. Because we needed the Title to come first, two text arguments were required. E3 for the Title and B3:D3 for the continuous range containing the three names.

TEXTJOIN to join names
TEXTJOIN formula with space separators

TEXT Function

This is a great function that’s been around for years. You really need this one when you have dates or numbers in your concatenation formula which you need to format. Dates in particular. And you’ll need an appreciation of basic Excel date and number format codes. The function works like this:

=FORMAT(value, format_text)

Value is what you are formatting and format_text is the number format code in quotation marks.

Here’s an example. We want to have a heading in our worksheet that reads “Report dated ” – and then include today’s date on the end. My first attempt was this:

=”Report dated “&TODAY()

Nice idea but no coconut! That date appears as a date serial value. You can have a date in a cell and then format the cell as a date. But the date is in the formula, so you must apply the format in the formula using the TEXT function:

=”Report dated “&TEXT(TODAY(),”d mmmm yyyy”)

Follow the link below if you’re not sure about Excel number format codes. The TEXT function supports Custom codes.

date formula first attempt
The first attempt
date formula with formatting
Formula including the date format
formula results
The completed formula
Excel course

To get the best out of Excel formulas you’ll need to have a good, working knowledge of Excel functions. Come along on our dedicated Excel functions course and discover what Excel formulas can do for you.

Call 020 7920 9500 now for details.

Related Posts

Excel SUMPRODUCT function

The SUMPRODUCT function is one of those hero functions that, once discovered, you wonder how you ever managed without. It does not just do “what it says on the tin”, there’s a lot more to it than that. In particular, it’s one of the most powerful and flexible filter functions in Excel. And so much better than SUMIF or SUMIFS.

Read More »
Age from Date of Birth

It’s easy to calculate someone’s age from their date of birth if you know about Excel’s DATEDIF function, unfortunately it’s easy to miss this function as it is not documented. Excel will not help you fill in the DATEDIF function interval values, you need to see the list here.

Read More »
Excel double click tricks

Our Excel double click tricks are some of those little things that make your life so much easier. You probably know most of them already. Or do you? I think that anyone who uses Excel regularly should know them.

Read More »
Excel New text Functions

Complicated text formulas using either ampersands and the CONCATENATE function are the bane of our life. Not any more! Excel new text functions will really help us nail those text formulas. We’ll be looking at the CONCAT function and the TEXTJOIN function.

Read More »
Excel Percentages and Differences

Usually the formulas you need for percentages and differences are quite straightforward: divisions for percentages and a minus sign to take one value from another. But there are pitfalls for the unwary which we shall explore.

Read More »
Excel Filter function

I think the Excel FILTER function does the filter job better than AutoFilter. It’s a live formula and an extraction, you don’t have to filter your data in place. There’s no need for that clunky Advanced Filter…

Read More »

Excel Percentages and Differences

Usually the formulas you need for percentages and differences are quite straightforward: divisions for percentages and a minus sign to take one value from another. But there are pitfalls for the unwary which we shall explore.

Excel Percentages and Differences

Excel Percentages and Differences

Percentages and Differences

Some of the most common calculations on Excel worksheets are Percentages and Differences. Percentages: Show one number as a percentage of another, or a percentage of the Grand total. We have to do these formulas constantly. Differences are just as common. Budget vs Actual, Plan vs Achieved, Current Year vs Previous Year etc. These formulas are the meat and drink of Excel worksheets.

Usually the formulas you need are quite straightforward: divisions for percentages and a minus sign to take one value from another. But there are pitfalls for the unwary which we shall explore. Read on…

Comparison

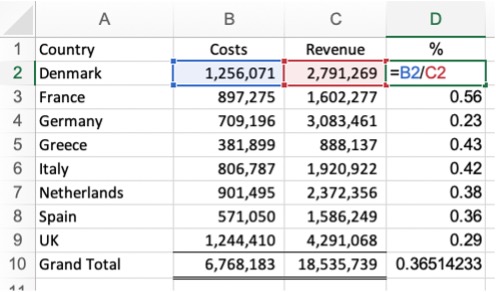
This is all about showing one number as a percentage of another number. In the example, we need to show Costs as a percentage of Revenue. In your formula, divide the smaller number by the larger number and then copy it down the column.

In the example, the formula’s really easy, =B2/C2

Costs v Revenue
Show Costs as a percentage of Revenue

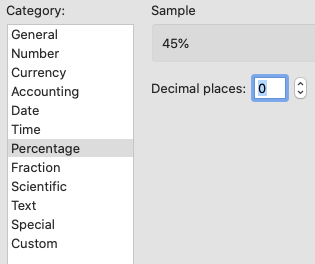
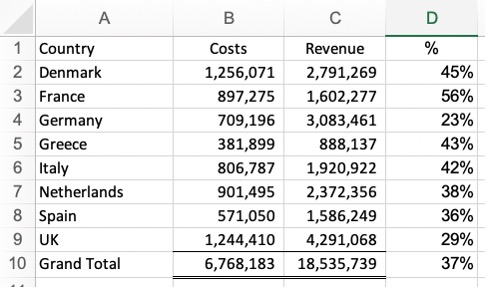
The formula is correct but the results are shown as decimals, Excel cells typically have a General number format. We need to show those results in column D as percentages so that they are easier for our audience to understand. To format the percentage cells either use the Percent Style control on the Home tab or right-click and choose Format Cells, then apply the Percentage category in the Number tab.

Most people find percentages much easier to comprehend than decimals.

Percent format
Percentage format

Percentage formats multiply the cell value by 100 and displays the result with a percent symbol.

Formatted results
The finished formulas

As a Percentage of the Total

This is a very popular calculation, showing a number as a percentage of the whole. Again, it works on the principle that people can interpret percentages far easier than they can raw numbers.

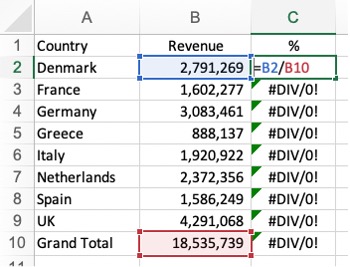
Formulas going wrong
Errors in our formulas

We’ve divided the Revenue for the first item by the grand total and it’s worked fine for the first calculation. But the formulas go haywire when copied down.

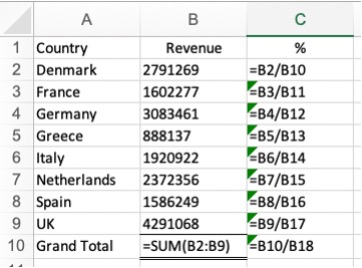
It’s obvious what the problem is when we show our formulas. The divisor, B10—the Grand Total, needs to be constant in our formulas. Time for dollar signs!

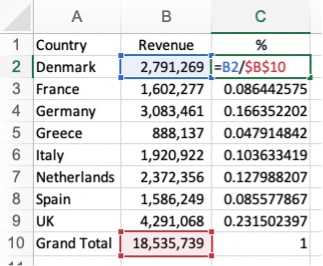
Normal cell references like B10 are relative. This means they change when they are copied down or across. To fix a cell reference in a formula, you need an absolute reference, like this $B$10.

Show Formulas
Show the Formulas in the cells
Dollar Signs
Fix the reference to the Grand Total

You don’t have to show the formulas in the cells but it helps you see what you’re doing. Click the Show Formulas control on the Formulas tab.

To enter the dollar signs, either type them in or click the B10 reference in your formula and then press the F4 key. (Try Command+T if you’re on a Mac)

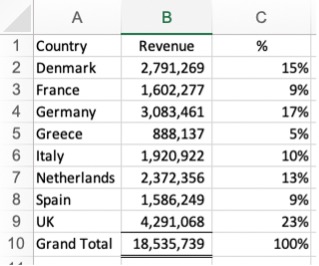
When you’ve fixed the cell reference in the first formula you can copy it down. Click Show Formulas again and then apply the percentage number format to your results.

finished-formulas
The final results!

Percentage Change, the Power of One

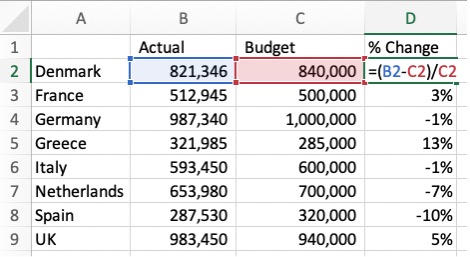
Usually, it’s considered bad practice to include constants (fixed numbers) in your formulas but there are a few exceptions when we’re using that magic number, Number One! In this first calculation we need to show the percentage change between two numbers, namely the percentage increase or decrease between Actual and Budget.

Percentage Change
Percentage change, the long way round

Here’s the simple and obvious method. Calculate the difference between Actual and Budget (B2C2 in the formula) and then divide the result by the Budget (C2 in the formula) Of course, we need to have brackets around the minus calculation as otherwise the division would be calculated first.

The formula works but it is too complicated as we have two references to C2 and that can’t be right.

And, indeed, it isn’t necessary to refer to the same cell twice but we’ll need a bit of magic mathematics to simplify the formula and force out the duplicated reference.

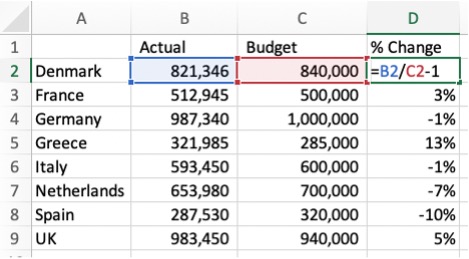
The original formula was =(B2C2)/C2, which we can reduce to: =B2/C2-1

Can you see what I did there? If you can’t follow it, have a look at the algebra of the formula in the following section.

The power of One
Percentage change, short version!
original formula

Here’s the algebra of the original formula. Actual minus Budget to calculate the difference. And then all divided by the Budget to calculate the percentage.

reduce formula

Firstly expand the formula: Actual divided by Budget minus Budget divided by Budget. This gives exactly the same result as the original.

simplify formula

And finally, reduce the formula. A number divided by itself is always one. So, we replace Budget divided by Budget with one. Much simpler and far more efficient.

Percentage Increase, the Power of One

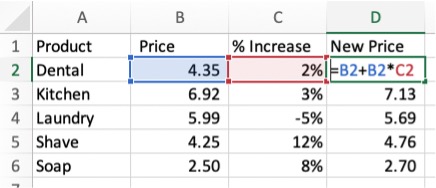
Here’s another calculation where it’s all too easy to create a formula which is easy to understand but too complicated. In the example we have Prices in column B, a Percentage increase or decrease in column C and we need to calculate the new price in column D.

Percentage increase formula
Original New price formula-too long!

Here’s my first attempt at the formula, it has the original price (B2 in the formula) plus the amount of the increase or decrease (B2*C2 in the formula):

=B2+B2*C2

Easy to understand but inefficient as there are two references to B2.

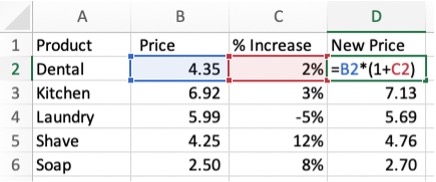
Once again, the formula needs to be simplified, it now becomes the original price (B2 in the formula) multiplied by one plus the amount of the increase or decrease:

=B2*(1+C2)

See the reduction algebra below.

Percent increase simple version
New price formula simplified
Percent increase formula

The first attempt was the original price plus the amount of the percentage increase to calculate the new price.

Percentage increase simple

To restate a value you just multiply it by one. Only, in this case, you increase the multiplier by the amount of the percentage increase. Dead easy, but just not obvious.

That’s all for now. I hope I managed to give you a few ideas on calculating Excel percentages and differences. Best of luck with all your Excel formulas!

Excel course

To get the best out of Excel formulas you’ll need to have a good, working knowledge of Excel functions. Come along on our dedicated Excel functions course and discover what Excel formulas can do for you.

Call 020 7920 9500 now for details.

Related Posts

Excel SUMPRODUCT function

The SUMPRODUCT function is one of those hero functions that, once discovered, you wonder how you ever managed without. It does not just do “what it says on the tin”, there’s a lot more to it than that. In particular, it’s one of the most powerful and flexible filter functions in Excel. And so much better than SUMIF or SUMIFS.

Read More »
Age from Date of Birth

It’s easy to calculate someone’s age from their date of birth if you know about Excel’s DATEDIF function, unfortunately it’s easy to miss this function as it is not documented. Excel will not help you fill in the DATEDIF function interval values, you need to see the list here.

Read More »
Excel double click tricks

Our Excel double click tricks are some of those little things that make your life so much easier. You probably know most of them already. Or do you? I think that anyone who uses Excel regularly should know them.

Read More »
Excel New text Functions

Complicated text formulas using either ampersands and the CONCATENATE function are the bane of our life. Not any more! Excel new text functions will really help us nail those text formulas. We’ll be looking at the CONCAT function and the TEXTJOIN function.

Read More »
Excel Percentages and Differences

Usually the formulas you need for percentages and differences are quite straightforward: divisions for percentages and a minus sign to take one value from another. But there are pitfalls for the unwary which we shall explore.

Read More »
Excel Filter function

I think the Excel FILTER function does the filter job better than AutoFilter. It’s a live formula and an extraction, you don’t have to filter your data in place. There’s no need for that clunky Advanced Filter…
Read More »

Excel FILTER Function

I think the Excel FILTER function does the filter job better than AutoFilter. It’s a live formula and an extraction, you don’t have to filter your data in place. There’s no need for that clunky Advanced Filter…
Excel FILTER Function

Excel Filter function

Excel FILTER Function

I really like Excel’s AutoFilter but I think the Excel FILTER function does the job better because it’s a live formula. And it’s an extraction, you don’t have to filter your data in place. This means it’s easy to have your results wherever you want them without having to bother with the Advanced Filter.

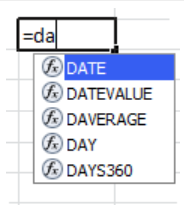
It’s a fairly new function so, as usual, the first thing is to check out whether you have it or not. Just click on an Excel cell, type-in “=FI” and see if you can spot FILTER in the pop-up list.

Here’s the data I want to filter, it’s a simple Excel list with 6 columns, A to F, with headings entered into the top row.

Dataset for FILTER

Basic Excel Filter Formula

And here’s the basic filter formula. I want to filter the list to just show the rows where I have “Agency” in column C.

=FILTER(A:F,C:C=”Agency”)

Basic filter

Sorting the Results

You can sort the results, if you want to, by wrapping the SORT function around the FILTER function, like this:

=SORT(FILTER(A:F,C:C=”Agency”))

Basic Sort

And that sorts the results in alpha order on the first column. But you can change this by entering extra information into the sort. In this example, I’m sorting the results by the 6th column (that’s my last column) with the highest number listed first. So, that’s minus 1 for descending order. Here’s the formula:

=SORT(FILTER(A:F,C:C=”Agency”),6,-1)

Sort by the last column

Filtering the Filter

Here’s the original filter formula again. You’ll see that the formula gives you all the columns from your data. You don’t always want that. To control the results you need to filter your filter.

=FILTER(A:F,C:C=”Agency”)

Basic filter

To do this put your original filter inside another filter and use an array of values to declare which columns to display in the results. The array is a set of zeros or ones inside a pair of braces (squiggly brackets). A one means show the column, a zero hides the column. Here’s my formula; out of the 6 columns, I’m showing only the second, third and sixth columns:

=FILTER(FILTER(A:F,C:C=”Agency”),{0,1,1,0,0,1})

Filter the Filter

More Complex Excel Filter Formulas

You can create complex filters by multiplying different expressions in your filter. Don’t worry about the internal logic, just copy and paste an example and adapt it to your own needs. I always do!

In this example, include everything where you have “Agency” in column C and the value in column E is 1000 or more:

=FILTER(A:F,(C:C=”Agency”)*(E:E>=1000))

Agency and Quantity filters

In this one, include everything where the value in column E is between 250 and 1000:

=FILTER(A:F,(E:E>=250)*(E:E<=1000))

Between 250 and 1000 filter

In this one, include everything where the value in column E is between 250 and 1000, but not where the value in column C is “Agency”:

=FILTER(A:F,(E:E>=250)*(E:E<=1000)*NOT(C:C=”Agency”))

Not include filter

Multiplication gives you a logical AND condition. If you want a logical OR, then use the plus sign. For example, this formula means include everything where the value in column C is either “Agency” or “In Store”:

=FILTER(A:F,(C:C=”Agency”)+(C:C=”In Store”))

Excel FILTER OR Condition

That’s all for now, best of luck with your filters!

Excel course

The FILTER function is just one of the new type of Excel functions, Dynamic Array Functions that were released with Excel 365. To learn more about these revolutionary functions, come along on our dedicated Excel Dynamic Array Functions Course.

Call 020 7920 9500 now for details.

Related Posts

Excel SUMPRODUCT function

The SUMPRODUCT function is one of those hero functions that, once discovered, you wonder how you ever managed without. It does not just do “what it says on the tin”, there’s a lot more to it than that. In particular, it’s one of the most powerful and flexible filter functions in Excel. And so much better than SUMIF or SUMIFS.

Read More »
Age from Date of Birth

It’s easy to calculate someone’s age from their date of birth if you know about Excel’s DATEDIF function, unfortunately it’s easy to miss this function as it is not documented. Excel will not help you fill in the DATEDIF function interval values, you need to see the list here.

Read More »
Excel double click tricks

Our Excel double click tricks are some of those little things that make your life so much easier. You probably know most of them already. Or do you? I think that anyone who uses Excel regularly should know them.

Read More »
Excel New text Functions

Complicated text formulas using either ampersands and the CONCATENATE function are the bane of our life. Not any more! Excel new text functions will really help us nail those text formulas. We’ll be looking at the CONCAT function and the TEXTJOIN function.

Read More »
Excel Percentages and Differences

Usually the formulas you need for percentages and differences are quite straightforward: divisions for percentages and a minus sign to take one value from another. But there are pitfalls for the unwary which we shall explore.

Read More »
Excel Filter function

I think the Excel FILTER function does the filter job better than AutoFilter. It’s a live formula and an extraction, you don’t have to filter your data in place. There’s no need for that clunky Advanced Filter…
Read More »

Excel UNIQUE Function

You can use the Excel UNIQUE function to extract a list of unique or distinct items from a range of Excel cell values. It’s really easy. See how to sort the results automatically when the data changes…

Excel UNIQUE Function

Excel UNIQUE function

List Unique Entries

You can use the Excel UNIQUE function to extract a list of unique or distinct items from a range of Excel cell values. It’s really easy.

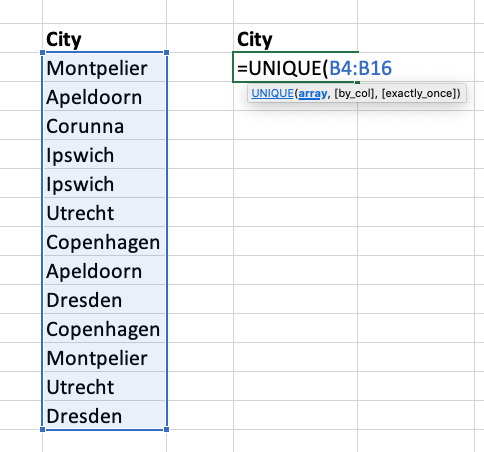
Entering the UNIQUE function

Just type “=u” into a cell and you’ll see a list of Excel functions pop up. Double-click UNIQUE in the list to start your formula. Enter the cell range that contains your values. Your formula should look something like this:

=UNIQUE(B4:B16)

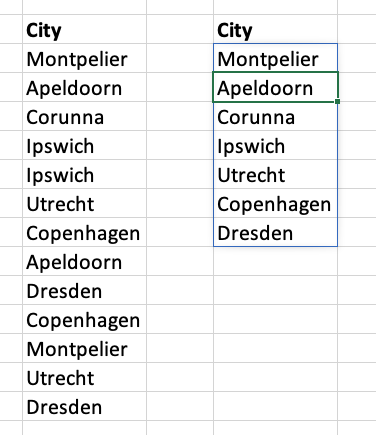
Press ENTER to see the results.

Make sure that you leave enough empty space under the formula to show the results. Otherwise you might get an error.

As the extraction is done with a formula that means it’s dynamic. You only have to do it once. If you ever change the entries in the original list then the extraction of your unique values automatically updates to reflect the changes.

Results of UNIQUE formula

Sorting the Results

Using the SORT function

Oh, you wanted the results in alphabetical order did you?

The UNIQUE function can’t do that, but the SORT function can. All you have to do is wrap one function inside the other.

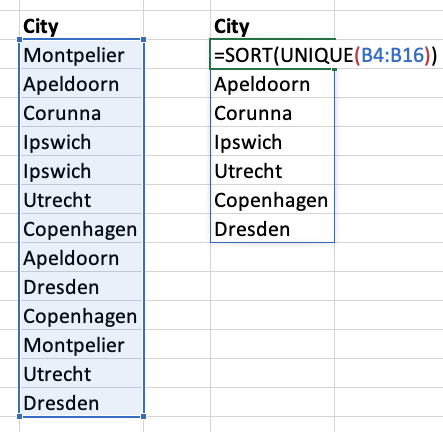
Double-click your formula so that you can do the required edit. Type SORT and an open bracket at the start then a closed bracket at the end.

Your formula should now look something like this:

=SORT(UNIQUE(B4:B16))

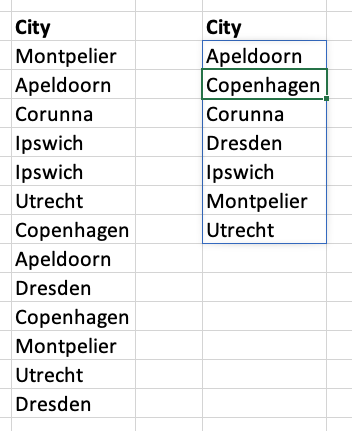
Press ENTER and your formula now returns the entries in alphabetical order. A-Z order is the default for the SORT function.

Results in A-Z order

Unique or Distinct?

Some people get very angry when you say things like “almost unique” or “very unique” because unique, properly, means “one of a kind”. It’s an absolute idea. The Excel UNIQUE function returns a list of everything in the list but excluding any repetitions. It should really be called DISTINCT, but they’ve gone for a more popular definition of unique.

Optional arguments for UNIQUE

You can change this if you want to.

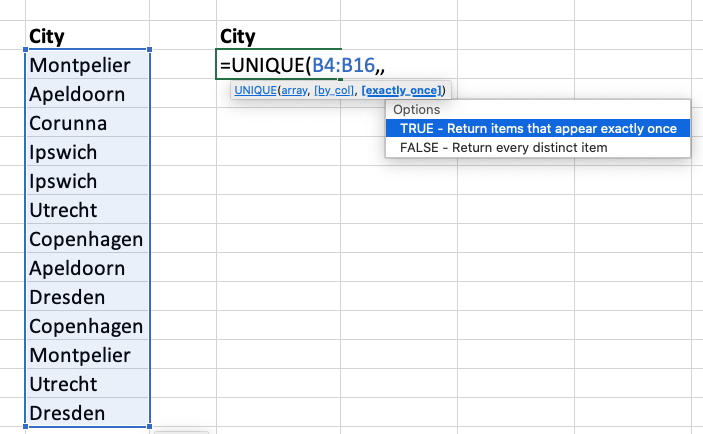
The function has a few optional arguments. You need the third one:

TRUE- Return items that appear exactly once

FALSE- Return every distinct item

Change your formula so that it reads as follows:

=UNIQUE(B4:B16,,TRUE)

Two commas means you’re giving the third argument. TRUE to return items that appear exactly once.

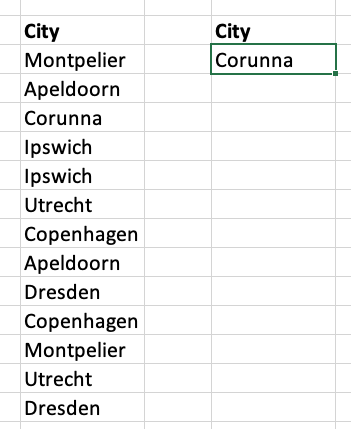
And here’s the result. There’s only one item. Corunna only appears once in the list. It’s one of a kind.

In fact, it’s unique!

One of a kind
Excel course

The UNIQUE function is just one of the new type of Excel functions, Dynamic Array Functions that were released with Excel 365. To learn more about these revolutionary functions, come along on our dedicated Excel Dynamic Array Functions Course.

Call 020 7920 9500 now for details.

Related Posts

Excel SUMPRODUCT function

The SUMPRODUCT function is one of those hero functions that, once discovered, you wonder how you ever managed without. It does not just do “what it says on the tin”, there’s a lot more to it than that. In particular, it’s one of the most powerful and flexible filter functions in Excel. And so much better than SUMIF or SUMIFS.

Read More »
Age from Date of Birth

It’s easy to calculate someone’s age from their date of birth if you know about Excel’s DATEDIF function, unfortunately it’s easy to miss this function as it is not documented. Excel will not help you fill in the DATEDIF function interval values, you need to see the list here.

Read More »
Excel double click tricks

Our Excel double click tricks are some of those little things that make your life so much easier. You probably know most of them already. Or do you? I think that anyone who uses Excel regularly should know them.

Read More »
Excel New text Functions

Complicated text formulas using either ampersands and the CONCATENATE function are the bane of our life. Not any more! Excel new text functions will really help us nail those text formulas. We’ll be looking at the CONCAT function and the TEXTJOIN function.

Read More »
Excel Percentages and Differences

Usually the formulas you need for percentages and differences are quite straightforward: divisions for percentages and a minus sign to take one value from another. But there are pitfalls for the unwary which we shall explore.

Read More »
Excel Filter function

I think the Excel FILTER function does the filter job better than AutoFilter. It’s a live formula and an extraction, you don’t have to filter your data in place. There’s no need for that clunky Advanced Filter…
Read More »

Excel Roman Numerals

You can use Excel’s ROMAN function in a formula whenever you need to express normal, Arabic numbers as Roman numerals. And you can use the ARABIC function to convert them back the other way…

Excel Roman Numerals

Excel Roman Numerals

Excel Roman Numerals

You can use Excel’s ROMAN function in a formula whenever you need to express normal, Arabic numbers as Roman numerals. 

Excel ROMAN function

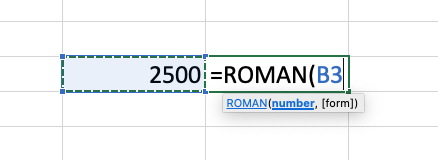
Just type “=r” into a cell and you will see a list of Excel functions pop up, then double-click ROMAN in the list to start your formula. If you like using the keyboard then type-in “=ro” and press the TAB key.

Enter the reference of the cell containing the number you want converted, in this case it’s B3. Then press ENTER and you’re done. Excel’s ROMAN function converts positive numbers up to a maximum of 3999. The optional Form argument gives you a choice of up to four degrees of simplification of the classic Roman form. For example, the value of 2500 can not be simplified and is expressed as roman MMD. However, 2499 is MMCDXCIX in the classic form but MMID in the simplified form. 

Enter your formula as =ROMAN(B3,FALSE) for the simplified form or use a number from 1 to 3 for the less simplified forms, i.e. =ROMAN(B3,2) gives you MMXDIX. Just enter the formula as =ROMAN(B3) if it can’t be simplified.

I’m glad we don’t have to use roman numerals in our Excel worksheets, it’s no wonder that Maximus was always in such a bad mood.

My name is Maximus Decimus Meridius. Father to a murdered son, husband to a murdered wife. And I will have my vengeance, in this life or the next.

Maximus

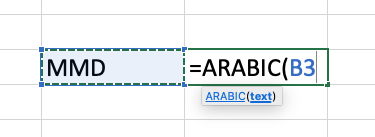
Excel’s ARABIC function

Excel ARABIC function

If you’ve already got Roman numerals and you want to convert them to normal, Arabic numbers, then use the ARABIC function.

Excel course

To learn more about the world of Excel functions, come along on our dedicated Excel Functions Course.

Call 020 7920 9500 now for details.

Related Posts

Excel SUMPRODUCT function

The SUMPRODUCT function is one of those hero functions that, once discovered, you wonder how you ever managed without. It does not just do “what it says on the tin”, there’s a lot more to it than that. In particular, it’s one of the most powerful and flexible filter functions in Excel. And so much better than SUMIF or SUMIFS.

Read More »
Age from Date of Birth

It’s easy to calculate someone’s age from their date of birth if you know about Excel’s DATEDIF function, unfortunately it’s easy to miss this function as it is not documented. Excel will not help you fill in the DATEDIF function interval values, you need to see the list here.

Read More »
Excel double click tricks

Our Excel double click tricks are some of those little things that make your life so much easier. You probably know most of them already. Or do you? I think that anyone who uses Excel regularly should know them.

Read More »
Excel New text Functions

Complicated text formulas using either ampersands and the CONCATENATE function are the bane of our life. Not any more! Excel new text functions will really help us nail those text formulas. We’ll be looking at the CONCAT function and the TEXTJOIN function.

Read More »
Excel Percentages and Differences

Usually the formulas you need for percentages and differences are quite straightforward: divisions for percentages and a minus sign to take one value from another. But there are pitfalls for the unwary which we shall explore.

Read More »
Excel Filter function

I think the Excel FILTER function does the filter job better than AutoFilter. It’s a live formula and an extraction, you don’t have to filter your data in place. There’s no need for that clunky Advanced Filter…
Read More »

Lorem Ipsum for Word and PowerPoint

Generating random text or Lorem Ipsum for Word and PowerPoint. Do you ever need filler or placeholder text for Word documents or PowerPoint text boxes? It’s quite handy when you want to plan the design and layout of your document…

Lorem Ipsum for Word and PowerPoint

Random text lorem ipsum

Generating Random Text for Word and PowerPoint

Generating random text or Lorem Ipsum for Word and PowerPoint. Do you ever need filler or placeholder text for Word documents or PowerPoint text boxes? It’s quite handy when you want to plan the design and layout of your document and check out different fonts and formatting options etc. Being an expert typist, I always used to type in double-encrypted blah, blah nonsense like this, “jkhj kefhkfh kjhjkhf hfshf jhkjhs” until I discovered random text functions. However, my typing speed has suffered, I was quite impressive typing “jkhj kefhkfh kjhjkhf” but now I’m back in the land of hunt and peck.

Random Text

shortcut for random text

To generate some random text, click on your document or on a PowerPoint text box, type in =RAND( ) and then press the ENTER key. Don’t forget the equals sign at the start and both the brackets at the end. You’ll get some paragraphs of random text. To control the number of paragraphs, enter a number inside the brackets. So, =RAND(5) gives you five paragraphs.

Lorem Ipsum

shortcut for lorem ipsum

If you have a classical bent then you may prefer some Latin, in which case type in =LOREM( ) and you get paragraphs of lorem ipsum.

Lorem ipsum dolor sit amet, consectetuer adipiscing elit. Lovely!

PowerPoint Course

To see how to create great presentations, come along on our PowerPoint Introduction Course.

Call 020 7920 9500 for full details.

Related Posts

Excel SUMPRODUCT function

The SUMPRODUCT function is one of those hero functions that, once discovered, you wonder how you ever managed without. It does not just do “what it says on the tin”, there’s a lot more to it than that. In particular, it’s one of the most powerful and flexible filter functions in Excel. And so much better than SUMIF or SUMIFS.

Read More »
Age from Date of Birth

It’s easy to calculate someone’s age from their date of birth if you know about Excel’s DATEDIF function, unfortunately it’s easy to miss this function as it is not documented. Excel will not help you fill in the DATEDIF function interval values, you need to see the list here.

Read More »
Excel double click tricks

Our Excel double click tricks are some of those little things that make your life so much easier. You probably know most of them already. Or do you? I think that anyone who uses Excel regularly should know them.

Read More »
Excel New text Functions

Complicated text formulas using either ampersands and the CONCATENATE function are the bane of our life. Not any more! Excel new text functions will really help us nail those text formulas. We’ll be looking at the CONCAT function and the TEXTJOIN function.

Read More »
Excel Percentages and Differences

Usually the formulas you need for percentages and differences are quite straightforward: divisions for percentages and a minus sign to take one value from another. But there are pitfalls for the unwary which we shall explore.

Read More »
Excel Filter function

I think the Excel FILTER function does the filter job better than AutoFilter. It’s a live formula and an extraction, you don’t have to filter your data in place. There’s no need for that clunky Advanced Filter…
Read More »

Cluttered PowerPoint Slides

Do you ever have to deal with those cluttered PowerPoint slides? You know; the ones crowded with layers of overlapping shapes and text boxes—and you need to change the one in the middle of the pile…

Cluttered PowerPoint Slides

Cluttered PowerPoint Slides

Cluttered PowerPoint Slides

Do you ever have to deal with those cluttered PowerPoint slides? You know; the ones crowded with layers of overlapping shapes and text boxes—and you need to change the one in the middle of the pile! You can’t see what you’re doing on these busy slides. Some people move all the other objects out of the way so that they can see the one they want. Then they make a few changes and then move them all back again in to, hopefully, their original positions.

There has to be a better way. You can use the keyboard shortcuts Tab and Shift+Tab to cycle forwards and backwards through the stack of objects until you can see that the selection handles are around the one you want. Or, you can press ALT+F10 and turn on the…

Selection Pane

ALT F10 Selection Pane

There’s a control to turn this on and off on the Home tab but it’s easily missed. The Selection Pane lists all the objects on your slide and you use it to identify and work on any object. Just click the Hide All button and then start clicking the eyes to the right to show selected objects, you’ll soon find the one you want. Make your changes, click the Show All button and you’re done. It’s so easy when you can see what you’re doing.

PowerPoint Selection Pane

PowerPoint uses its own fiendish naming scheme for all your objects. Name like Rectangle 5, TextBox 4 etc make perfect sense until you have to animate them and then you have real problems trying to identify specific objects. All you have to do is rename them according to their appearance or purpose and you’ll have a much easier time creating animations.

An object named something like “Black Heart” or “Red Star” is a lot easier to deal with than “Heart 4”. To rename an object, click the current name in the pane and replace the text.

There’s nothing wrong with having cluttered PowerPoint slides—you just need to know how to work with them easily.

PowerPoint Course

To see how to create great presentations, come along on our PowerPoint Introduction Course.

Call 020 7920 9500 for full details.

Related Posts

Excel SUMPRODUCT function

The SUMPRODUCT function is one of those hero functions that, once discovered, you wonder how you ever managed without. It does not just do “what it says on the tin”, there’s a lot more to it than that. In particular, it’s one of the most powerful and flexible filter functions in Excel. And so much better than SUMIF or SUMIFS.

Read More »
Age from Date of Birth

It’s easy to calculate someone’s age from their date of birth if you know about Excel’s DATEDIF function, unfortunately it’s easy to miss this function as it is not documented. Excel will not help you fill in the DATEDIF function interval values, you need to see the list here.

Read More »
Excel double click tricks

Our Excel double click tricks are some of those little things that make your life so much easier. You probably know most of them already. Or do you? I think that anyone who uses Excel regularly should know them.

Read More »
Excel New text Functions

Complicated text formulas using either ampersands and the CONCATENATE function are the bane of our life. Not any more! Excel new text functions will really help us nail those text formulas. We’ll be looking at the CONCAT function and the TEXTJOIN function.

Read More »
Excel Percentages and Differences

Usually the formulas you need for percentages and differences are quite straightforward: divisions for percentages and a minus sign to take one value from another. But there are pitfalls for the unwary which we shall explore.

Read More »
Excel Filter function

I think the Excel FILTER function does the filter job better than AutoFilter. It’s a live formula and an extraction, you don’t have to filter your data in place. There’s no need for that clunky Advanced Filter…
Read More »